Showing posts with label How To Do Things. Show all posts

Friday, August 8, 2014

How to Do Things: Wrap a DVF Wrap Dress

Hello everyone and welcome to another edition of "How to Do Things"!


Recently, I was thrift shopping and I was about to give up hope on finding anything truly special. Suddenly, I saw what appeared to be a vintage wrap dress. I pulled it out of the racks and checked the label... it was a Diane von Furstenberg wrap dress! For only $25! In my size! I could not believe my eyes! (I hope the exclamation points are giving you a hint of how excited I was and still am about this.) I never imagined that I would find a designer dress that I could afford, so I quickly bought it and brought it home. Unfortunately, there was one problem... I had no idea how to wrap it properly, especially once I saw a slit on the side that was clearly meant to be there (it was sewn in, not a rip). A quick search on Google brought me to this website. I found the tutorial to be helpful, but I wished that it had pictures, so I decided to take some of my own for you!
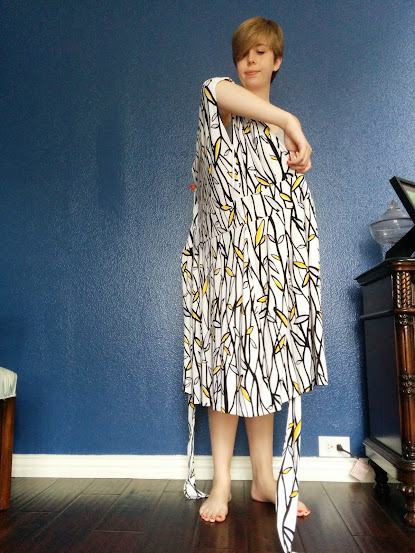
1. Put your arms through the armholes. (This is probably fairly obvious...) 

2. Find the slit that I mentioned earlier. (Here I am pointing to mine.)
3. Take the tie/sash thing on the opposite of the slit and...
4. ...put it behind your back (but still inside the dress). (Also, I am sorry about my clothes that I wore under the dress to show you how to wrap the dress. I did not even know this tank top had a hole until looking at the pictures later.)
5. Now, take that sash from inside the dress through the slit so it is now outside of the dress. You want to pull it tight enough that the dress is beginning to cling to your body, but not too tight.
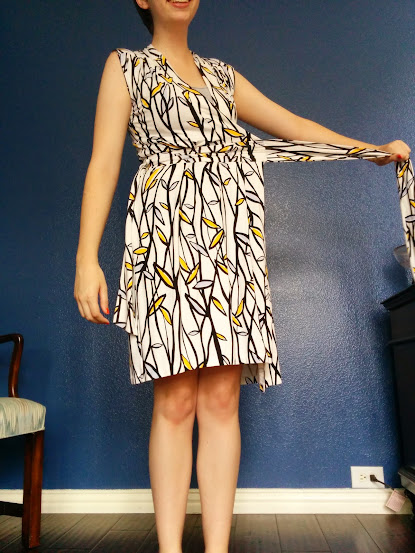
6. This is a good time to grab the other tie/sash thing (the one that you did not bring through the slit).
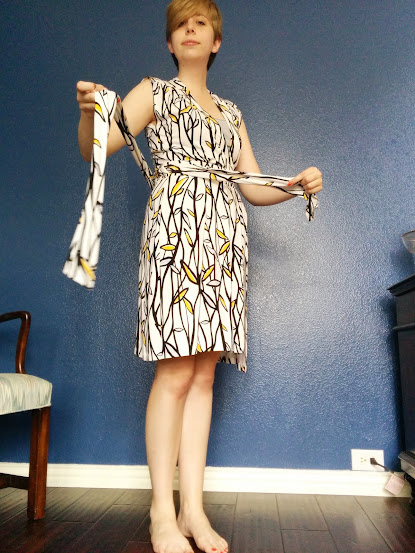
7. Wrap that tie that you just grabbed around your body (outside of the dress; because it is a wrap dress). Both of your ties will be pointing the same direction because both of the ties wrapped in the same direction (mine both went to my left).
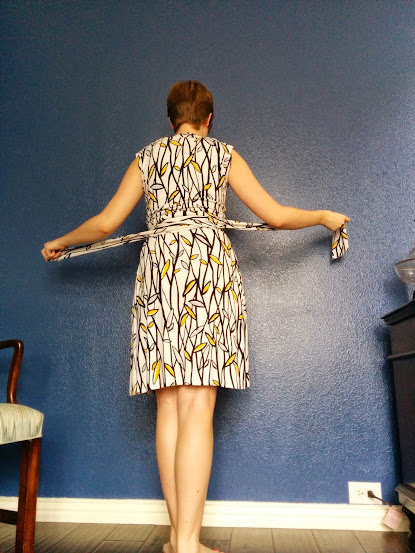
 
8. Now, you are going to cross both of the ties so they are facing different directions so one can go around the front and the other will wrap around your back. This is what it looks like in the back...
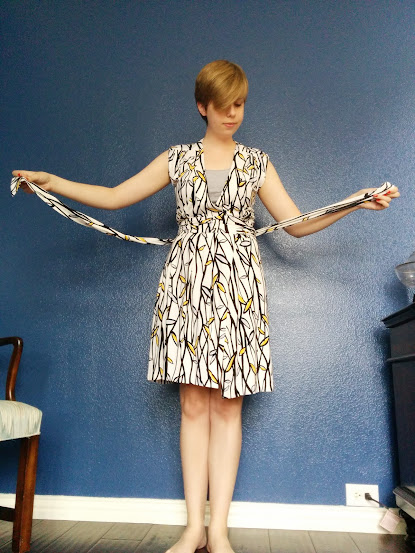
9. ...And this is what it looks like in the front.
10. You are now going to bring both of your ties to the side opposite of the slit. As previously mentioned one tie goes around your front and one goes around your back. Now you can tie the ties/sashes!
11. This final step is optional: If you notice, quite a bit of my tank top is still showing, because the dress is cut to be sexy/revealing. So, after I removed my clothing under the dress, I safety pinned the top so I could feel a little more comfortable and confident.
TA-DA!

If you have any questions or need any clarifications, please let me know! Also, if you have any awesome thrift finds, I would love it if you shared with me via Instagram!

I hope that you have a great weekend,
Rachel Cathleen

Wednesday, July 23, 2014

How to Do Things: Making a Skirt Out of a Scarf

Being thrifty, I like to wear clothing articles in different ways and in as many unique outfits as possible, so I can get the most bang for my buck. Because of this, I was intrigued when I saw this pin, which you may have seen before:
How amazing is this?? Scarf to sexy skirt!
Image via pinterest
Now, when I first saw it, I honestly doubted that it would work. I mean, come on, can the skirt even stay up?! And then the pintester tried it. As you can see here, the draped skirt did not really work for her. Suddenly, I was even more doubtful in the credibility of this pin.

Then in late May, another blog I read, "a pair & a spare" tried a very similar version of this skirt and she looked adorable in it. Here is her tutorial featured on another website and here is her wearing it on her blog. Oh, so you tie it and it stays! Ok, that seems reasonable. Immediately, I decided to try it. And now two months later, I am actually trying it. Sometimes life gets busy. And, sometimes it takes a storm to ruin your errands run and give you enough free time to try making a skirt out of a scarf and take photos for your blog.

1. Hold the scarf like a towel and you are about to dry yourself off. (If you were going to wear this out, you probably would not want to wear shorts under it, I just did not want the world to see my undergarments.)

1.5. You should not be exactly in the middle. Turns out, it works better if one side of the scarf reaches to the side of your hip and does not make it around to your bum. The other side of the scarf needs enough fabric to reach around as far as possible.

2. Wrap one side around. Preferably, there will not be so much extra fabric. Ideally, the edge of the scarf will hit between your front and your bum.

3. Take the other side of the scarf, bring it around the front and twist it a half turn (so the side that was facing towards your body before will now face out).

4. Cross the front around to the back and tuck it in. Or tie it. Mine was not long enough to tie.

5. If you cannot tie the scarf into a skirt, make sure you tuck all of the scarf edge into the back of the skirt. Or it will look like this, and it looks pretty silly. 

This is what the final product looks like. It does not look great and is fairly loose. Ironing would probably help. You may not be able to tell here (or you maybe you can), but where the skirt hits on my body also makes my stomach look larger than normal (that could just be me; I typically wear high-waisted bottoms so I am not used to how I look with a skirt on my hips). I decided to try again, making it as tight as possible and starting at my natural waist instead of my hips.

This is what it looks like when I redid it. (I'm sorry that this picture is so blurry.)

I decided to test the skirt's ability to not fall down. This is what it looks like after sitting and standing up again. As you can see, my shorts are noticeable at the bottom, which means the skirt rode up. 

I pulled the skirt back down and then tried walking up and then downstairs again. My shorts are sticking out a little. (And, apparently, my hands are permanently attached to my hips.)

All in all, yes, the scarf skirt stayed on my body, but I had to pull it down. I do not think that I am brave enough to try wearing it in public without shorts (or at all). Possibly, ironing would help prevent the skirt from riding up. Or maybe a different fabric? Maybe if it were wider or longer? If you have tried the draped scarf skirt (or you decide to give it a try now, or in several months like I did), how did it work for you? Let me know!

Have a great rest of your week, it is halfway over!
Rachel Cathleen

Tuesday, July 15, 2014

How to Do Things: Take a Break from Homework, Studying for the GRE, Chores, or Whatever Else That is Making You Busy

Have you ever read a problem, did not not understand it, read it 100 more times, still not get it, ask someone to explain it to you, and then immediately figure it out and feel stupid for not understanding it sooner? Yeah, that's this problem.
I did not make a post yesterday, which I apologize for. I studied for the GRE and read articles for my thesis all day, so I did not have time to take pictures for a post. The back-up plan was to take pictures today and then make a post. Instead, I spent 9 hours in the lab. My ideas for this post became so desperate, I briefly considered taking pictures of me microwaving my lunch and making that a "How to Do Things" (that may happen another week...).

But, I did have to take a break during my busy 9 hours, so I listened to music from Lewis Watson's new album (and then several other songs, my lunch break was longer than like 5 minutes). If you need a study (or work) break, here is what you do:

Step 1. Click the links below.
Step 2. Listen to each song.
Step 3. Relax.
Step 4. Get back to work!


If you cannot tell, I really enjoy Lewis Watson's music. He appears to be really popular in the UK, but I want him to be popular here in the U.S. (I am not a hipster: I want everyone to like the same musicians I do so they will keep producing new music...).

I hope I taught you a simple way to take a break and that you have a great week!
Rachel Cathleen

Tuesday, June 17, 2014

How To Do Things: Avocado, Egg, and Tomato Grilled Cheese

The judges of Chopped would probably not be impressed with my plating.

So, I would like to preface this with the fact that I gave myself two weeks to perfect my sandwich making skills. In two weeks, I still cannot make this sandwich... and I invented it.

Last year, my friend convinced me to work out with her so I was on a brief health kick and I wanted to come up with a great recipe that would cover most of my needed food groups (protein, dairy, bread/carbs, fruits/vegetables). Then I had a brilliant idea and immediately called my mom to tell her about my sandwich idea. Within minutes, she discovered plenty of people on the internet had come up with this perfect sandwich. My mom has even made it for me several times when I visit home. However, I had never made this sandwich on my own... until two weeks ago.

For this recipe, you will need:
  • 1 egg
  • 2 slices of bread
  • 1-2 slice(s) of cheese
  • 1 avocado
  • 1 tomato
  • Sriracha Sauce (optional)

First, I needed to learn how to make the perfect sunny-side up egg, because normally I mess them up and then they just become fried eggs. My first attempt went surprisingly well. My second attempt ended in a partially uncooked egg. So cook the egg however you want for this sandwich. No one wants to eat raw eggs (unless it is in cookie dough; yum!).

Next, put a slice of cheese on one slice of bread and toast the bread/melt the cheese on the stove (or both, but keep the bread separate and not in sandwich form, yet; if you are only using one slice of cheese, you can just toast the other in a toaster). Actually, I could never get this to work. I bought super cheap generic target cheese and it would not melt. At all. I even tried other ways the internet suggested, for example:

Source: http://www.artfido.com/blog/40-clever-life-hacks-to-simplify-your-world/

I thought, for sure, that I would end up with melted cheese stuck to my toaster. Fortunately, that did not happen. Unfortunately, the piece of toast in the top slot shot across the room and was super burnt. The cheese toast was not burnt, but the cheese still was not melted. I really think it was the "cheese" at this point. Or the fact that I don't own a toaster oven (my friends were surprised this weekend about my lack of kitchen utensils, like a blender).

Point is, somehow melt cheese onto toasted bread. If you want sriracha sauce, put it onto one or both of your slices of bread. Next, cut up your tomato into thin slices and put as many slices of tomato onto one slice of bread. Then, cut open your avocado, scoop out as much as you want, and put as much as you want on top of the tomato slices. Finally, put your other cheese toast on top and you have finished your sandwich. Eat and enjoy!

In case you need pictures/videos for the steps, I have included some from the internet because taking pictures and cooking at the same time is rather difficult.

Making a sunny-side up egg (but, you can prepare the egg any way that you want): http://www.wikihow.com/Make-Sunny-Side-up-Eggs

Slicing a tomato: https://www.youtube.com/watch?v=T0xVthFSJBg

Pit and Cut an Avocado: https://www.youtube.com/watch?v=ieIPSV7jRmE

If you master this recipe, please share it with me! I would love helpful tips and tricks from you.
Rachel Cathleen

Wednesday, June 4, 2014

How To Do Things: Cutting Overalls into Shorts

Hello again! It's time for another tutorial on how to (more or less) do something!


As you may know, overalls are trendy now. And, fortunately, I already own a pair. Unfortunately, they are actually meant for use as overalls, therefore, they are not figure flattering. So, how should I solve this problem? Cutting them into shorts, of course! Worst case scenario, they still are not figure flattering, but I can wear them all summer and it does not matter since I do not see many people (unless I plan on going to the psychology lab to work on my thesis or need to run errands, in that case, I can just change).

So, let's get started. First, I went to Google and, for curiosity's sake, I looked up cutting jeans into shorts and there were about 17.8 million results (in .36 seconds). On the other hand, cutting overalls into shorts has 1/10th as many results. Obviously, the internet needs one more (namely, mine).

Now that we have used Google, we can really start. This new first step is to take awkward video of yourself modeling the overalls and then take screenshots for your blog so everyone can see the "before" look. Lovely.

I am sorry that this is so blurry. I did not know how to take a photo without holding my phone (I have since figured it out). So, as previously mentioned, I took a video and took a snapshot of me modeling these overalls. Also, I only noticed that I had not buttoned both sides in the video until after I already had finished the project, so...use your imagination to what it would look like buttoned.
They are not flattering on me (if you can rock long ovies, more power to you.)
Now, you need to figure out where to cut. I would recommend trying on your overalls over a pair of shorts that you already like the length for and can figure out how they should line up on your overalls for cutting later (if you can, I tried and failed). Originally, because my shorts are high-waisted, I lined mine up to the waist rather than the hips. However, I wanted to roll up my short overalls, so I pulled my shorts lower so I had enough room to cuff the diy. Remember, you can always cut more off later, you cannot put more back on (at least easily).

Here I have my overalls lined up with my shorts so I know where to cut them.
Up close and personal. 
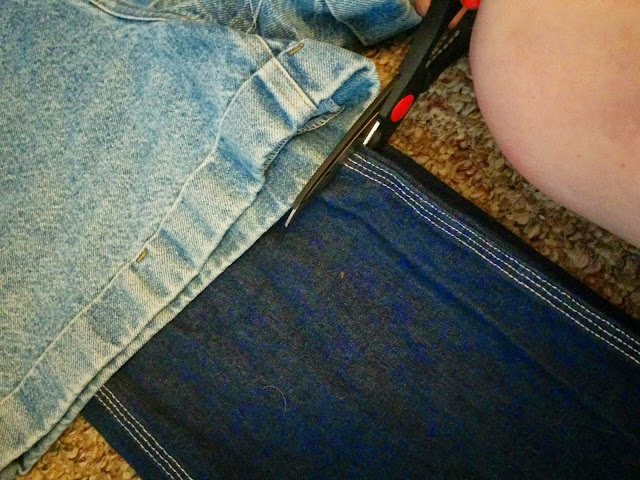
Cutting the overalls is the next step. Some people recommend cutting through both legs at once. That is a good time saver, except that makes it easier to mess up the project. Plus, if you cut one leg first, you can check the length to see if it needs to be any shorter. And once you approve of the length, you can cut the other leg in the first go.


One leg down, one to go. If you are confident in the length, go ahead and cut the other leg. Just follow along the cut for the other leg so both legs are the same length!
Here is the length after the first cut (before making it into a cuff). I considered going a little shorter, but that would require me ruining a nifty little side pocket.
Want to know how it turned out looking when worn? Well, tune in tomorrow to check out what the final product looks on!
Rachel Cathleen

P.S.- Let's be honest, I probably forgot to mention some really important step. If so, feel free to comment below or email me and we can figure out the critical missing instructions.

Monday, May 26, 2014

How To Do Things: Ice Cream Sandwiches

Good morning.

I would just like to take a moment to say thank you to everyone who serves and has served and to there family. I hope that you receive the respect you deserve at least today, because many times we fall short of honoring you every other day of the year. 

Additionally, I hope everyone has had an enjoyable weekend, whether you went to a parade to honor those who serve, had a barbecue, went swimming, relaxed, or whatever else you did/are doing.

If you are still looking for something to do, I can provide. A few weeks ago I found this:

Embedded image permalink
Source: https://twitter.com/LifeHacks/status/459552340442640384/photo/1

Look how easy! It is just 3 steps and then it is ready to eat! So my boyfriend (Daniel, he told me it is fine for me to use his name) and I decided to try them out.

  • First of all, we went to the store to buy the ingredients. 
    • We debated about buying pre-made cookies (so we could cut out the steps relevant to baking cookies) or cookie dough (so we could eat raw cookie dough later; which is dangerous, so don't do that; sorry, Mom). We ultimately bought cookie dough (the one in the yellow tube).
    • We also did not buy Ben & Jerry's. Partially, that is because we are cheap. The other reason was because we would have to use have a container of Ben & Jerry's each since we did not know how to store it once it was sliced open. Instead, we bought little Blue Bell cups of ice cream that are always served at kids' birthday parties.

  • So, if you buy cookie dough, follow the instructions they give you (We made our's like twice as big as normal on accident, it made holding the ice cream easier. If you do that, too, do not change the directions in any other way.) 
  • If you bought pre-made cookies, or already have cookies, you are doing great!
Here are what they looked like fresh out of the oven.
Cookies and ice cream, perfect combo!
  • Ok, now we are putting on the ice cream. So do you see in that first picture how easy it is to cut that carton? Well, blue bell cartons are apparently made of paper steel. Those things would not cut. At all. So we took spoons and stabbed around the edges (between the ice cream and the carton) until it was loose enough to scoop out in one piece.
  • Then put the ice cream on once cookie, and put another cookie on top!
  • Now, you have an ice cream sandwich! Yay!
  • Now... get a bowl, the ice cream is way too thick to stay together and not make a huge mess. Seriously, we each took like one bite of our respective sandwiches and then got bowls. Hey, it is still two cookie layers with ice cream in between. That still counts as delicious in my book.
See, that sandwich is WAY too thick to last. Also worth noting, Daniel used vanilla. So if you wanted to be festive today or July 4th (which is kind of coming up), you could add red and blue sprinkles!
I used chocolate ice cream, which is much better (You know, if you prefer chocolate ice cream)! Also, we first tried this a few weeks ago (hence, the sweatshirt and my hair still long enough to be in a ponytail), and since then, we have made these so often we are almost out of ice cream and cookie dough.

I hope you try these, because they really are yummy. Let me know if you try it a different way and how it works for you!

Best,
Rachel Cathleen

Wednesday, May 14, 2014

How To Do Things: Floral Crown

Good evening!


So I have wanted to start crafting, baking, knitting, doing my own makeup in interesting ways, etc. for a while now. Essentially, I am interested in doing things.

The problem with doing things is 
1. I rarely have time because I have class and 
2. I lack the talent to do most things.

Fortunately, the world has Pinterest and countless YouTube and blog tutorials for pretty much everything. Plus, they are always as easy as 1, 2, 3. You know: step 1 is gather your supplies, step 2 is do whatever you're trying to do, and step 3 is show off your awesome whatever to all of your friends and family (or just take a bunch of pictures and make a blog post about it).

If you cannot see what I am getting at, the internet (as awesome as it is), makes a fatal flaw: it assumes we already are good at doing things. But, really, if I was already good at doing whatever, why would I bother looking up a tutorial? I mean, did it really only take the original person 3 steps? Because it takes me like 50 to do some of the same simple activities and only 37 led to a total failure, which means they at least left out 13 or so steps. This gave me an idea: why don't I try to do things and give you all the steps the tutorials left out, like the fact that no one already owns half the stuff that the tutorials claim that you just have around the house.

So today I am going to tell you all about making a flower crown, because I like flower crowns and want it to be socially acceptable to wear one (which will become a reality if you make one and wear it, too).

How to make a flower crown:
  • Pick the busiest week possible to decide to do this craft, preferably a finals week or just a really stressful week in general.
  • Whine about how you never get to do anything fun to anyone who will listen.
  • Decide to look at the craft store's coupons anyway, preferably at 1 am (when it seems like the best idea)
  • Realize that this day is the last possible day to take advantage of their 60% off sale (fortunately, you have finished your last final, or other super stressful activity)
  • Be financially responsible: pick out the flowers that you want for your floral crown online ahead of time, you do not want to go to the store and be overwhelmed.
  • Go to the store and see this:

Totally overwhelming aisle of silk flowers,
  • Realize that you are never going to find the flowers that you originally wanted.
  • Pick out new flowers and become completely and totally attached to these inanimate objects.
  • Find the flowers you originally wanted to purchase (remember, you are still attached to the flowers that you already found, but also the ones that you found online).
  • Decide that it is a great idea to make 6 flower crowns. Because...they're 60% off?
  • Decide not to buy floral wire because you know you already have some and you will not need it anyway (By the way, you definitely need it. Buy it now. Really. I promise. You will see why in a minute).
  • Go to the check out counter, talk with the woman working at the check out counter about shoes and wedding planning.
  • Realize that she is actually engaged and hide your left hand for the rest of the conversation because you are an awkward human being.
  • Pay and leave; while driving decide that this should become a blog post.
  • Get home and see how many flowers that you bought:
Displaying IMG_20140510_133510.jpg
So many flowers.

  • Decide to make your flower crown using the "daisy chain" method.
  • Google "How to daisy chain."
  • Choose not to look at the Urban Dictionary definition (you know it will be gross anyway).
  • Learn how people make daisy flower crowns with real flowers, it seems applicable to silk flowers.
  • Cut the daisy, like this:

Surprisingly violent.
Cut off the leaf things and it will look like this.
  • Now, with daisy chaining, you simply cut a slit towards the bottom of the flower; I thought it would be brilliant to use a seam ripper for this. Getting it to poke through was surprisingly easy. Making a slit was pretty much impossible.

Shockingly (sarcasm), this method failed because plastic and real plants are not the same.
  • Give up on this method (preferably after your boyfriend notices what you are doing and as nicely as possible tells you that your idea is not as awesome as you originally thought). You [I] have a tried and true method for making flower crowns anyway. Ok, you [I] have only made one. But, that one time you [I] made a flower crown, Hello Luvvy (here is their much better tutorial) used your [my] picture on Instagram:
Fun fact: this is a blurry picture of what I looked like last year.

  • Measure your head and bend floral wire into the shape around your head where you want it to sit (or skip measuring it, just bend it).

It'll look like this.
Mine fit like this.
  • You will notice mine needed two pieces of floral wire and I twisted them together; hot glue could probably work to secure it, too.
  • Next, give up on those daisies. Clearly, it was their fault for your previous failure. Move on to a different flower.
  • Behead these new flowers; mine could just pop off:

Before...
Pop!
  • Cut really close to the silk flower part:

Like this.
It will look like this.
  • Hot glue the flower to the floral wire.

You probably should craft on a table or something... The spiral on the bed method worked for me, so, there's that...
You can kind of see the hot glue here. You can also see where a plastic flower stem scratched me. This craft may seem dainty, but it is super dangerous. Consider yourself warned.
Finished Product! (Just kidding. I went back and added one more yellow flower that night. It was even across, but the uneven pattern made it look uneven. So that had to be fixed. You can just do it right in the first place.)
  • Now go show off! You look great!


Go out, craft, take pictures, and let me know how it goes!

Best,
Rachel