Thursday, June 19, 2014

Birthday Celebrations


I turned 21 a few weeks ago, so I thought I would share a few of my older birthday photos and some from my past weekend's birthday celebration!

Here is my older brother and infant me.

Look at that precious smile ;)


We posed with the hog outside of the Clinton house.
Pageant pose. He puts up with us.


Everyone is probably thinking (or maybe not), "You turned 21! I bet you had a crazy party!" Actually, I spent most of my actual birthday at a clinic because I woke up with chest pains. Apparently, my rib cage was inflamed. Awesome, I know. 

To make up for that though, I got to have a joint birthday party with one of my best friends and some of our childhood friends came to visit. It was a lot of fun because I only get to see them briefly each summer and winter break so it is always great to get to catch up with them. Plus, I got a high score at an arcade, which made me feel surprisingly proud, until I was told the scores are reset every day; suddenly that high score became much less impressive. 

All in all, year 21 is off to an interesting start, let's see where it goes.
Rachel Cathleen

(In case you are curious, my skirt is from Grey Dog)

Tuesday, June 17, 2014

How To Do Things: Avocado, Egg, and Tomato Grilled Cheese

The judges of Chopped would probably not be impressed with my plating.

So, I would like to preface this with the fact that I gave myself two weeks to perfect my sandwich making skills. In two weeks, I still cannot make this sandwich... and I invented it.

Last year, my friend convinced me to work out with her so I was on a brief health kick and I wanted to come up with a great recipe that would cover most of my needed food groups (protein, dairy, bread/carbs, fruits/vegetables). Then I had a brilliant idea and immediately called my mom to tell her about my sandwich idea. Within minutes, she discovered plenty of people on the internet had come up with this perfect sandwich. My mom has even made it for me several times when I visit home. However, I had never made this sandwich on my own... until two weeks ago.

For this recipe, you will need:
  • 1 egg
  • 2 slices of bread
  • 1-2 slice(s) of cheese
  • 1 avocado
  • 1 tomato
  • Sriracha Sauce (optional)

First, I needed to learn how to make the perfect sunny-side up egg, because normally I mess them up and then they just become fried eggs. My first attempt went surprisingly well. My second attempt ended in a partially uncooked egg. So cook the egg however you want for this sandwich. No one wants to eat raw eggs (unless it is in cookie dough; yum!).

Next, put a slice of cheese on one slice of bread and toast the bread/melt the cheese on the stove (or both, but keep the bread separate and not in sandwich form, yet; if you are only using one slice of cheese, you can just toast the other in a toaster). Actually, I could never get this to work. I bought super cheap generic target cheese and it would not melt. At all. I even tried other ways the internet suggested, for example:

Source: http://www.artfido.com/blog/40-clever-life-hacks-to-simplify-your-world/

I thought, for sure, that I would end up with melted cheese stuck to my toaster. Fortunately, that did not happen. Unfortunately, the piece of toast in the top slot shot across the room and was super burnt. The cheese toast was not burnt, but the cheese still was not melted. I really think it was the "cheese" at this point. Or the fact that I don't own a toaster oven (my friends were surprised this weekend about my lack of kitchen utensils, like a blender).

Point is, somehow melt cheese onto toasted bread. If you want sriracha sauce, put it onto one or both of your slices of bread. Next, cut up your tomato into thin slices and put as many slices of tomato onto one slice of bread. Then, cut open your avocado, scoop out as much as you want, and put as much as you want on top of the tomato slices. Finally, put your other cheese toast on top and you have finished your sandwich. Eat and enjoy!

In case you need pictures/videos for the steps, I have included some from the internet because taking pictures and cooking at the same time is rather difficult.

Making a sunny-side up egg (but, you can prepare the egg any way that you want): http://www.wikihow.com/Make-Sunny-Side-up-Eggs

Slicing a tomato: https://www.youtube.com/watch?v=T0xVthFSJBg

Pit and Cut an Avocado: https://www.youtube.com/watch?v=ieIPSV7jRmE

If you master this recipe, please share it with me! I would love helpful tips and tricks from you.
Rachel Cathleen

Thursday, June 5, 2014

Shortalls


I don't know if overalls that aren't long are called shortalls... but they should be! So, here I am modeling my brand new shortalls!


Please ignore my lack of shoes. What is rather pathetic is that I am going through my closet so every pair of shoes I own were only a few feet away from me, so I could have easily put them on... Pretend my bare feet are "summery."


 My shirt is from the Vintage Wolf Shop (similar and similar) and the overalls I bought at Atwoods and are Round House Brand (these are the same brand and these look more similar).

If you try out yesterday's How To Do Things, please share your pictures with me, I would love to see!
Rachel Cathleen

Wednesday, June 4, 2014

How To Do Things: Cutting Overalls into Shorts

Hello again! It's time for another tutorial on how to (more or less) do something!


As you may know, overalls are trendy now. And, fortunately, I already own a pair. Unfortunately, they are actually meant for use as overalls, therefore, they are not figure flattering. So, how should I solve this problem? Cutting them into shorts, of course! Worst case scenario, they still are not figure flattering, but I can wear them all summer and it does not matter since I do not see many people (unless I plan on going to the psychology lab to work on my thesis or need to run errands, in that case, I can just change).

So, let's get started. First, I went to Google and, for curiosity's sake, I looked up cutting jeans into shorts and there were about 17.8 million results (in .36 seconds). On the other hand, cutting overalls into shorts has 1/10th as many results. Obviously, the internet needs one more (namely, mine).

Now that we have used Google, we can really start. This new first step is to take awkward video of yourself modeling the overalls and then take screenshots for your blog so everyone can see the "before" look. Lovely.

I am sorry that this is so blurry. I did not know how to take a photo without holding my phone (I have since figured it out). So, as previously mentioned, I took a video and took a snapshot of me modeling these overalls. Also, I only noticed that I had not buttoned both sides in the video until after I already had finished the project, so...use your imagination to what it would look like buttoned.
They are not flattering on me (if you can rock long ovies, more power to you.)
Now, you need to figure out where to cut. I would recommend trying on your overalls over a pair of shorts that you already like the length for and can figure out how they should line up on your overalls for cutting later (if you can, I tried and failed). Originally, because my shorts are high-waisted, I lined mine up to the waist rather than the hips. However, I wanted to roll up my short overalls, so I pulled my shorts lower so I had enough room to cuff the diy. Remember, you can always cut more off later, you cannot put more back on (at least easily).

Here I have my overalls lined up with my shorts so I know where to cut them.
Up close and personal. 
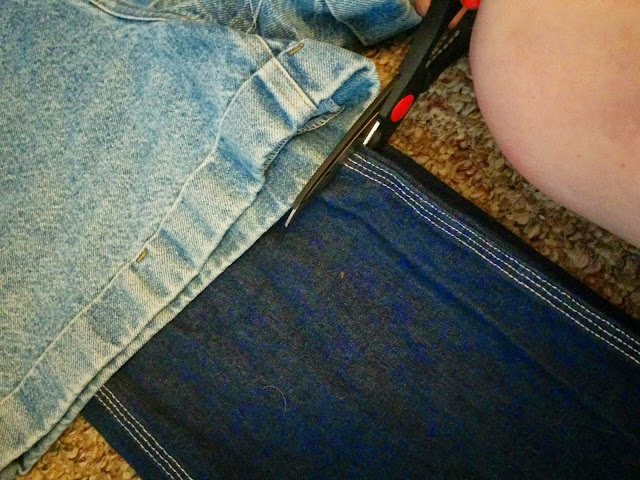
Cutting the overalls is the next step. Some people recommend cutting through both legs at once. That is a good time saver, except that makes it easier to mess up the project. Plus, if you cut one leg first, you can check the length to see if it needs to be any shorter. And once you approve of the length, you can cut the other leg in the first go.


One leg down, one to go. If you are confident in the length, go ahead and cut the other leg. Just follow along the cut for the other leg so both legs are the same length!
Here is the length after the first cut (before making it into a cuff). I considered going a little shorter, but that would require me ruining a nifty little side pocket.
Want to know how it turned out looking when worn? Well, tune in tomorrow to check out what the final product looks on!
Rachel Cathleen

P.S.- Let's be honest, I probably forgot to mention some really important step. If so, feel free to comment below or email me and we can figure out the critical missing instructions.